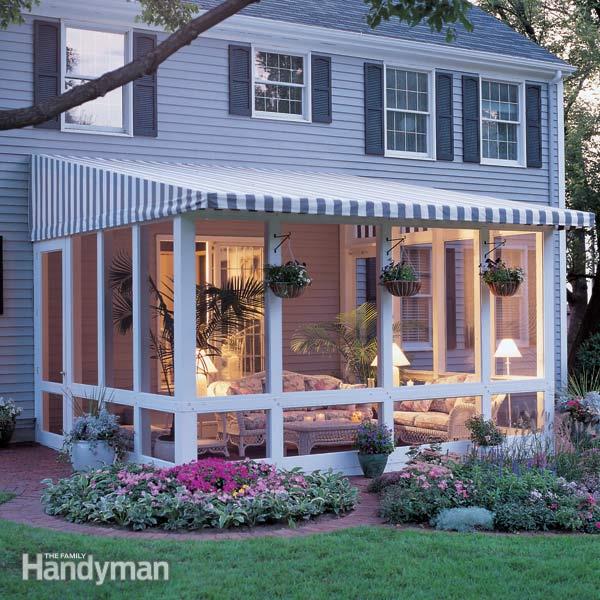
Screened In Patio overview
However much you love your patio, there may be just too many days when it’s not fit to live on. Our enclosure turns a patio—or a deck—into a space as comfortable as another room of your house.
Of course, a closed in porch won’t keep out the cold, but the roll-down shades will block out most of the rain. And, thanks to the screens and the awning soffit (Photo 16), you can forget about mosquito attacks.
Our 14 x 16-ft. enclosure is a big project, but it’s the best of any do it yourself screen porch kits around! Although it’s fairly simple structurally, it requires careful work with a lot of large-dimension lumber. The trickiest part is getting all these components square and plumb, which probably calls for more than a beginner’s skills. And you’ll spend a lot of time building—two or three weeks going at it full time, or much of a summer in your spare time.
We built our screen room roof high enough to preserve a pleasant view through the sliding doors. In summer, the awning top shades the bright sun, yet allows plenty of light to pass into the house. And here’s the biggest selling point for this project: You can easily remove the awning in winter and let the sunshine in. The structure is designed to look good even without the awning top. Of course, you could leave the awning on all year in many parts of the country, but it won’t support a heavy snow load.
The awning is attached as shown in Fig. E and Photos 15 and 16. A slide-in channel at the peak and turnbuckle clips along the edges make for a quick, no-hassle on-and-off in spring and fall. The approximately 16 x 16-ft., one-piece, vinylized canvas weighs only about 10 lbs., so it’s easy to handle.
We had our screen room awning top made by a professional awning maker, who also handled the initial installation. As an alternative, you can also consider metal or plastic roof panels, which are sold at most home centers.
Before beginning any work, be sure to have your local building inspector look at your plans. Your town may have special requirements for a structure such as this, and will probably require a building permit and inspection. Your inspector may also require the enclosure to be checked by a structural engineer. Even if it’s not required, the cost of an inspection is a worthwhile investment in peace of mind. NOTE: Building codes in some regions require additional seismic and highwind anchors for a patio screen room like this. Ask your building inspector about local requirements for a screen room.
For a furniture-quality interior, use D-grade (nearly blemish-free) cedar for the entire structural framework, with the exception of the laminated 1-3/4 x 12-in. beam (Photos 5 and 6) at the peak. You can substitute treated lumber for the framework, which will cut costs substantially, though the wood will show some imperfections. The foundation timbers are pressure-treated 6x6s. Bolts, screws, door hardware, paint and other miscellaneous hardware will add several hundred dollars to the cost.
We first painted our enclosure with a stain-blocking primer coat—make sure the label says that the product blocks cedar stains—to seal the cedar so it doesn’t discolor. We followed that with a topcoat of white latex paint. Do your painting before mounting the screens and doors. NOTE: If you choose not to paint, you’ll probably want to have your screens made of bronze-colored aluminum frames rather than white.
Screen for screened in porch
Measure for the screens after the structure is completed. Buy custom-made screens for the enclosure and the doors, or make your own. If you live in the Sun Belt, you might want to consider using a sun-blocking screening material (available at some home centers or online).
As an alternative to custom-made screens, you might want to consider securing the screening directly to the framing. However, this system does not allow the screens to be taken down and put back up easily.
The total cost for our patio enclosure will range from several thousand if you use less expensive materials to two or three times that amount (or more) for premium lumber and professionally made screens.
Figure A: Foundation and Post Layout for a Closed in Porch
Adapt this 14-ft. by 16-ft. plan to your backyard. For a large, printable version, see Additional Information, below.
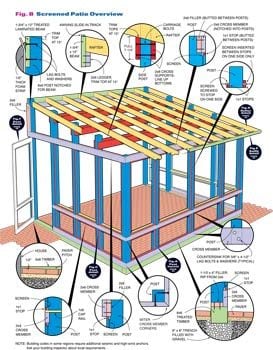
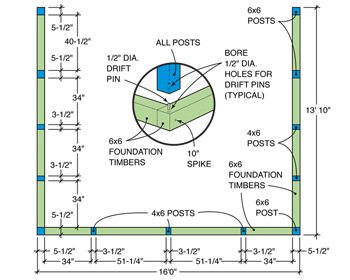 Figure B: Screened Patio Overview
This cutaway diagram explains the framing details. For a large, printable version, see Additional Information, below.
 Framing details Laying the foundation for the screened in porch
  Photo 1: Establish the perimeter lines
Lay out the perimeter lines of the closed in porch enclosure with mason’s string for the outside of the foundation timbers (Photo 3). Check the layout for squareness: Diagonal measurements should be equal.
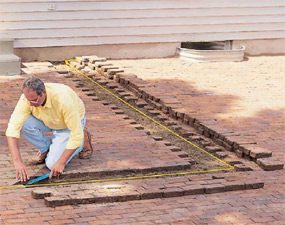
Photo 2: Remove the pavers
Remove the pavers to a width of about 1 ft. Stack the pavers neatly so you can later cut and replace them in the same slots. Then dig a trench 8 in. wide x 8 in. deep and fill it with crushed gravel. Level the gravel and tamp it smooth.
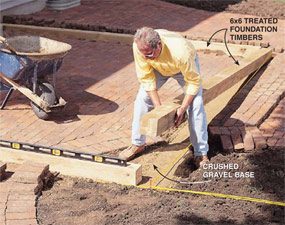
Photo 3: Set the timbers on the gravel
Lay 6×6 treated (.60) timbers on the crushed gravel base. Level the timbers if necessary by adding or removing gravel. Predrill holes, and nail the timber corners together with 10-in. spikes. Cut the pavers with a masonry wet saw and reinstall them so they fit tight against the timbers.
The paver patio on which we built our enclosure was already in place, and we designed the enclosure to accommodate its shape. We extended one corner into the circular planting bed, as shown in Photo 1. (For paver installation how-to, see “Build a Stone Patio or Brick Patio.”)
Lay out the perimeter lines with mason’s string. Make sure the perimeter is square by measuring diagonally from corner to corner in both directions. The diagonals should be equal.
We then removed the pavers along the entire patio enclosure perimeter (Photo 2), and dug a trench 8 in. wide and 8 in. deep. Fill the trench with crushed gravel of 3/8-in. or smaller rock. To accommodate any slope in the patio, level the gravel so that the foundation timbers will sit about 1/2 in. above the patio surface at its highest point, then tamp the gravel thoroughly. Since our 6×6 foundation timbers (Photo 3) rest directly on the ground, we bought pressure-treated timbers with a higher .60 preservative level rather than the standard .40.
The structure of our enclosure is not attached to the house anywhere; it is supported entirely by the foundation timbers. This exempts the entire screen room structure from the more stringent building code requirements that would otherwise apply. However, it’s important to firmly embed the foundation timbers in gravel and on top of soil that won’t sink, compact or suffer severe frost heave.
After the foundation timbers were level and securely in place, we replaced the pavers, cutting them with a masonry wet saw (available at most tool rental outlets) to fit tightly against the foundation timbers. Fitting the pavers tightly anchors the timbers against shifting.
Assembling the closed in porch framework  Photo 4: Notch the vertical posts
Mark and notch all the vertical posts into which the horizontal framing cross members fit. Cut as much as possible with a circular saw, then complete the cuts with a handsaw. For the notches that receive the intermediate horizontal 2x4s, make multiple cuts with the circular saw, then break out the thin remaining waste strips and smooth the inner surfaces with a sharp wide chisel.
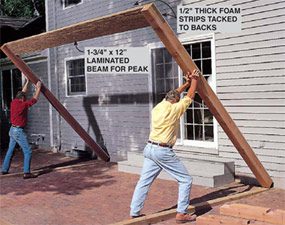
Photo 5: Install the rear posts
Mount the laminated peak beam to the two rear posts with lag bolts, then raise the assembly into place. Strips of 1/2-in. thick foam tacked to the back sides fill in the irregular siding gaps to keep out bugs. Secure the assembly temporarily with two diagonal braces.

Photo 6: Install the front corners
Install the front corner posts and secure them with temporary diagonal bracing. Then fit the upper horizontal 2x6s into the post notches and secure them with one screw at each joint. Measure diagonally from corner to corner on all four sides, and move the temporary bracing as necessary to ensure that all the sides are square, and all posts plumb.
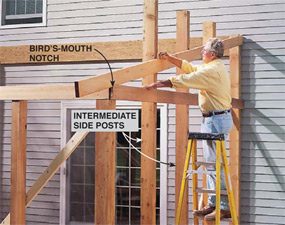
Photo 7: Cut the side posts
Place the intermediate side posts temporarily with one screw, letting them run long. Then temporarily place an end rafter that has a bird’s-mouth notch, and mark the posts for cutoff flush with the top of the rafter. Take the posts down and cut them to length.
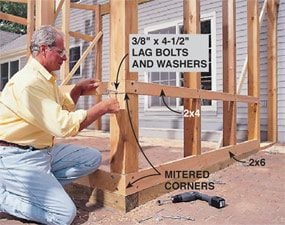
Photo 8: Bolt the frame together
Lag-bolt all the framing members securely together with two 3/8-in. x 4-1/2 in. lag bolts at each joint. Predrill 3/16-in. pilot holes into the posts to prevent splitting, then 3/8-in. clearance holes in the horizontal members. Countersink the washers and bolt heads.
Begin your screen room framework assembly by notching all the 6×6 and 4×6 vertical posts to receive the horizontal framing members (Photo 4 and Fig. C).
Mark the position for all the vertical posts on the foundation timbers. Drill 1/2-in. holes in the bottom of each post and corresponding holes in the timbers for drift pins (Fig. A). These pins, cut from 1/2-in. steel reinforcing rod (normally used to strengthen concrete slabs), hold the posts in position on the foundation.
To obtain the necessary span strength, we used a pressure-treated 1-3/4 x 12-in. laminated beam at the peak (Photo 5), which you’ll probably have to special-order at a full-service lumberyard. Mount the laminated beam to the notches in the two rear vertical posts with lag bolts. Use washers, and countersink the washers and the lag bolt heads. Tack sill seal—1/2-in. thick foam strips to block bugs and water drips—to the back of the posts and beam. Then raise the assembly in place, dropping the posts onto the drift pins. Hold the posts in place with temporary 2×4 diagonal braces.
Raise the two front corner posts into position, fitting them onto the drift pins. Hold the posts plumb, and secure them in position with temporary diagonal bracing, as shown in Photo 6. Then install the upper horizontal 2×6 framing members, and temporarily fasten them in place with one screw at each joint. Note that the front upper horizontal 2×6 is notched into the posts; the upper horizontal 2x6s on the sides are flush-mounted to the posts.
To obtain the correct length for the three intermediate vertical posts on each side, tack them in place with one screw at each joint, leaving them overlong. Then temporarily place the two outside rafters in position, and mark the posts for the angled cutoff, as shown in Photo 7. Note that the rafters have a small “bird’s-mouth” cutout at the eave, as shown in Fig. D. Unscrew the posts, take them back down and cut off the excess post tops with a circular saw.
Cut the bottom horizontal 2x6s and intermediate horizontal 2x4s to length (we mitered these corners for appearance, as shown in Photo 8) and tack them in place in the post notches.
After all the vertical and horizontal framing members are in place, predrill all the holes for the 3/8-in. x 4-1/2 in. lag bolts—two at each joint—and countersink the washers and bolt heads, then lag-bolt the entire screen room structure together (Photo 8).
Figure C: Post Detail
Notch the posts as shown. For a large, printable version, see Additional Information, below.
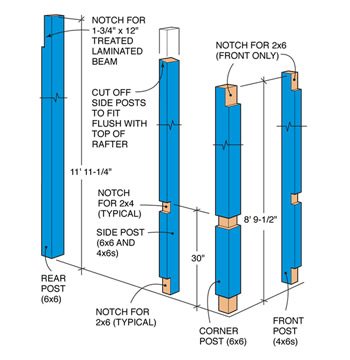 Figure C: Post detail Framing the roof
 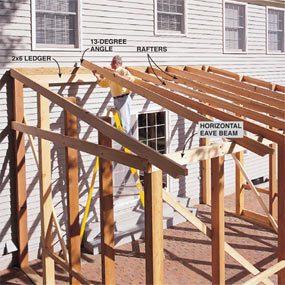 Photo 9: Place the rafters
Mount the rafters to the peak beam with the ends resting on a 2×6 ledger. Carefully sight along the length of the rafters so any bows are placed “crown up.” The upper rafter ends are cut to 13 degrees (or adjusted to your project) and the lower ends rounded on their bottom edges and notched for bird’smouths. Secure each rafter with angle-driven 3-1/2 in. deck screws—three at the peak and two at the eave.

Photo 10: Add cross supports
Install roof cross supports to the posts, first with one screw at each post, then two tightly secured all-the-way-through bolts at each joint. Then angle-screw each rafter to each cross support with two 3-1/2 in. screws.
Screw a 2×6 ledger board to the laminated peak beam to support the upper ends of the rafters (Photo 9 and Fig. D). Cut all the rafters to length, making 13-degree angle cuts (or adjusted to your project) at the upper ends to fit against the peak beam. Use a jigsaw to cut the concave ends on the rafter tails, as shown in Fig. D, and the bird’s-mouths at the eaves.
Mount the two end rafters first, then the center rafter, then divide the space evenly on both sides of the center rafter to position the others. Secure the rafters with angle-driven screws to the peak beam and the ledger board, and to the horizontal eave beam.
To rigidly brace the roof and the entire freestanding screen room structure, cut the 2×8 roof cross supports (they’re painted red in Photo 10 for clarity). The top edges of these cross supports are beveled 13 degrees (or adjusted to your project), and the cross support on the lower side of each post is cut narrower so that the bottom edges of the paired supports are flush. Mount the cross supports in place with one screw at each post, then secure the rafters to them with angledriven 3-1/2 in. deck screws—two screws for each rafter into each cross member. To give the structure lateral strength, the cross supports are secured to the posts with tightly fastened carriage bolts rather than lag bolts—two at each post.
Figure D: Rafter Detail
Cut the rafters as shown. For a large, printable version, see Additional Information, below.
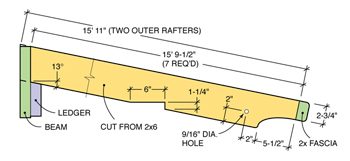 Figure E: Soffit Detail
Figure E shows the soffit and awning details. For a large, printable version, see Additional Information, below.
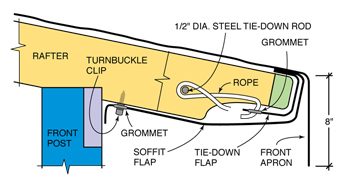 Figure E: Soffit detail Assembling the doors
 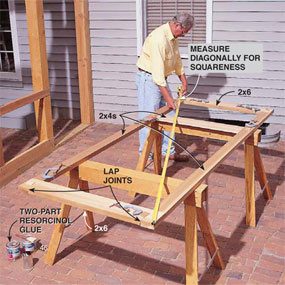 Photo 11: Construct the doors
Build doors from straight 2x4s and 2x6s. Make sure the doors are square by adjusting for equal diagonal measurements. Cut lap joints by making multiple cuts with a circular saw, then cleaning out the waste with a sharp chisel. Sand the joint surfaces smooth, then glue and clamp them with waterproof two-part resorcinol glue.
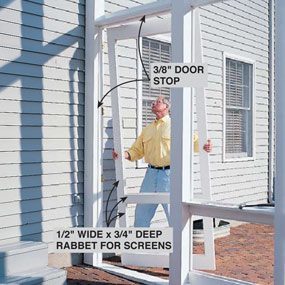
Photo 12: Hang the doors
Hang the doors with four 3-1/2 in. butt hinges, and install latches and handles and pneumatic door closers. Note the 1/2-in. x 3/4-in. deep rabbets routed into the inside door edges for screens.
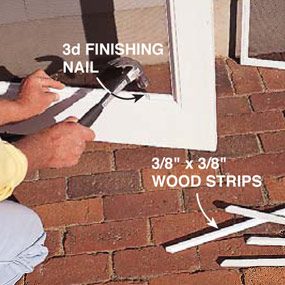
Photo 13: Add screen frames
Tack screen frames in place in the doors with 3/8-in. x 3/8-in. wood strips and 3d finishing nails.
The two screen room doors are constructed from clear, straight cedar 2x4s for the side rails and center crosspiece, and 2×6 pieces for the tops and bottoms (Photo 11 and Fig. F, p. 48). The doors are 1/2 in. smaller than the door opening in each direction for clearance. Cut lap joints at the corners and for the center crosspiece, and glue the joints with resorcinol glue, which is waterproof and super-strong. Square the door by measuring diagonally in each direction, as shown, then clamp the joints until the glue dries.
Rout 1/2-in. wide x 3/4-in. deep rabbets on all the inside edges of the doors to receive the 3/8-in. thick aluminum screen frames. The door screens are held in place with strips of wood that are tacked in place with 3d galvanized finishing nails after painting is completed, as shown in Photo 13.
Mount the doors with four butt hinges, and install latches and handles, and if desired, pneumatic door closers. Note that we installed horizontal lengths of 2×4 to the frame for headers above the doors, and 3/8-in. thick door stops along the sides and top (Photo 12).
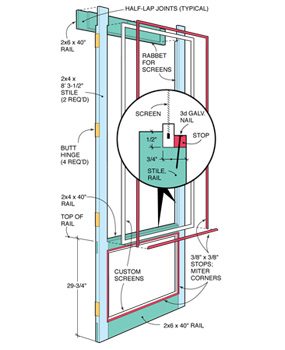
Figure F: Screen Room Door Detail
Build the doors using this plan. For a large, printable version, see Additional Information, below.
 Mounting the screens for screened in porch
 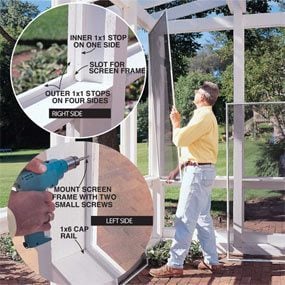 Photo 14: Install the screens
Place screens in the openings, held in place on the outside by 1×1 stops nailed flush with the outside of the framing. A single 1×1 stop on the inside provides a slot for one side of the screen frame to slide into, then the other side is secured with two small screws through holes drilled in the screen frame.
The custom screens were made 1/4 in. smaller than the openings in each direction. The white aluminum-channel frames are 3/8-in. thick x 1 in. wide.
The screens are held in place on the outside using 1×1 stops nailed along the outer perimeters of the openings (Photo 14). The screens are secured on the inside using a 1×1 along just one side, leaving a slot for the screen frame to slide into. Then the screen is tacked in place with two small screws through the opposite aluminum frame. Note the 1×6 cap rail on which the upper screens rest. This cap rail also provides a convenient place to set your iced tea while you’re enjoying a summer breeze.
Installing the awnings 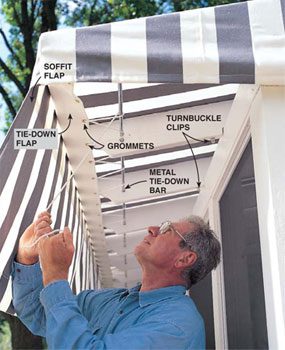 Photo 15: Install the awning
Secure the awning to the tie-down flap with rope. The tie-down flap, with grommets, and the soffit flap are sewn onto the inside front edge of our custom-made awning. The 1/2-in. dia. metal tie-down bar slides into place through holes drilled into the rafter ends.
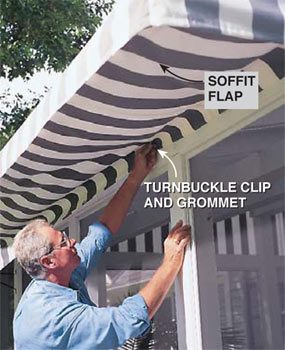
Photo 16: Attach the soffit flap
Attach the soffit flap with grommets and turnbuckle clips mounted on the rafter bottoms (Photo 15 and Fig. E).
To ensure an exact fit, our awning maker took his measurements after the screen room enclosure was built. It then took two weeks for the awning to be made and installed. The awning has an 8-in. apron dropping down vertically along the front edge, with this bottom edge line continuing along the sides, slightly above the tops of the doors. It’s the perfect addition to our outdoor enclosed patio.
Photo 15 shows two flaps sewn to the awning’s front edge in addition to the apron: The rear tie-down flap has grommets along the edge through which rope is threaded. The rope is wound around the tie-down bar that slides in through holes drilled in the rafter ends. This allows the awning to be pulled taut. The longer soffit flap, intended to keep out bugs, attaches to the horizontal eave frame member with turnbuckle clips (Photo 16).
Have the necessary tools for this DIY screened porch project lined up before you start—you’ll save time and frustration. Circular sawCordless drillDrill bit setForstner drill bitsFraming squareHammerHandsawHearing protectionJigsawLevelMiter sawOrbital sanderPaintbrushSafety glassesSpadeSpeed squareStepladderWood chisel
Required Materials for this screened in porch Project
Avoid last-minute shopping trips by having all your materials ready ahead of time. Here’s a list. See Materials List in “Additional Information”
What are some considerations to keep in mind when planning the layout of a screened-in patio?
A screened-in patio is a gorgeous addition to your home, providing a comfortable and private outdoor living space that can be enjoyed for years to come. Not only does it protect you from pesky bugs, but it also provides a great space for enjoying the outdoors without having to deal with direct sunlight or inclement weather. Here, we’ll give you a step-by-step guide on how to build a screened-in patio.
1. Plan the space
The first thing you’ll need to do is plan the layout of your new screened-in patio. Determine where you want it located and how much space you’ll need. You’ll also need to decide on the size of the screens, the type of material you want to use for the flooring, and whether you want to add any additional features, such as a ceiling fan or lighting.
2. Gather your materials
Once you’ve decided on the layout of your screened-in patio, it’s time to gather your materials. You’ll need screens, framing material, roof material, flooring material, and any additional features you want to add.
3. Prepare the foundation
Before you can begin building your patio, you’ll need to prepare the foundation. To do this, dig a 6- to 8-inch deep trench around the perimeter of the patio. This will give you a stable base to attach the framing material to.
4. Build the frame
Now it’s time to build the frame of the screened-in patio. The frame is typically made of wood or metal and will provide support for the screens and roof. The frame should be securely attached to the foundation and the house.
5. Install the screens
Once the frame is in place, it’s time to install the screens. Start by measuring the opening and cutting the screen material to fit. Attach the screens to the frame with staples or screws. You can also add a screen door for easy access in and out of the patio.
6. Add the roof
Now that the screens are in place, it’s time to add the roof. The roof can be made of a variety of materials, including corrugated metal or fiberglass panels. Make sure the roof is securely attached to the frame and that there are no gaps where rainwater can seep through.
7. Install the flooring
Finally, you can install the flooring. This can be as simple or as complicated as you’d like. You can use a variety of materials, including pavers, concrete, or wood decking. If you choose wood decking, be sure to use treated lumber to prevent rot.
8. Add any additional features
Now that your screened-in patio is complete, you can add any additional features you’d like, such as a ceiling fan or lighting. These features will add to the comfort and enjoyment of your outdoor living space.
Overall, building a screened-in patio can be a great DIY project for homeowners who are handy with tools. By following these steps and taking your time, you can create a beautiful outdoor living space that you can enjoy for years to come.


The Brothers Who Aged Backwards (Medical Documentary)
TESTING The Weirdest Axe Ever Made
A Japanese Master Craftsman Taught Me To Make Senko Hanabi Fireworks
Catch and Cook from ISOLATION – Uninhabited Island Paradise! Sailing Vessel Delos Ep. 272
Family rescue bear found swimming with a plastic jar on its head