

 InfoSearched
A coil of soaked pine needles and a tapestry needle turn forest litter into a basket, start to finish.
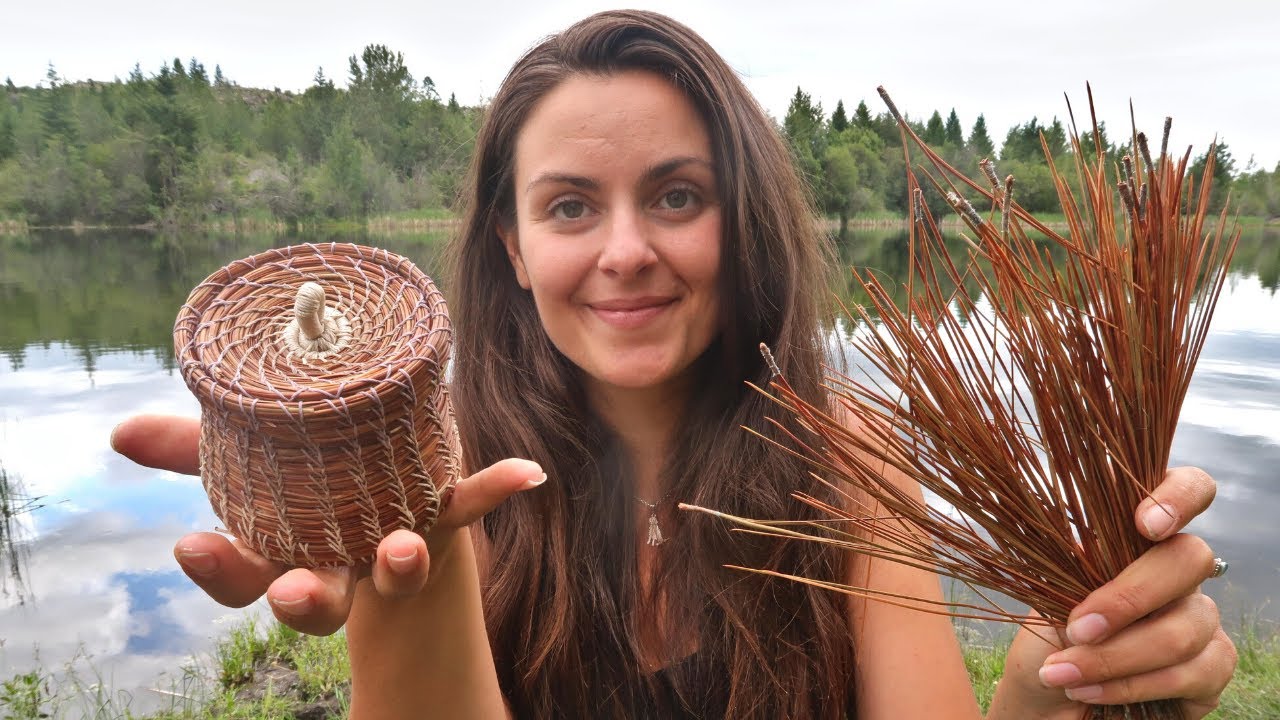
Wild She Goes, the bushcraft and outdoor-living channel known for foraged-material builds, walks through the entire process of weaving a coiled pine needle basket in one sitting. The creator frames herself as a beginner throughout, noting upfront that handwoven pine needle baskets will always carry small imperfections — but that the craft itself is simple enough to pick up with materials most people can gather in a nearby stand of pines.
The video is a genuine start-to-finish template: prepping raw needles pulled from the forest floor, softening them in water, coiling a base, and building walls up to a finished rim. Nothing about it is staged or shortcut — every stitch is shown with a tapestry needle and thread, the same way traditional coiled basketry has been done for generations.
- The build uses only gathered brown pine needles, thick thread or waxed linen cord/sinew, a large tapestry needle, and scissors — no specialty tools.
- Needles are cleaned, sorted by size, stripped of their bottom caps (fascicle sheaths), and soaked in water so they bend without snapping.
- The basket wall is formed by angling each new coil on top of the previous row rather than beside it, and the piece is finished by tapering the bundle and knotting the cord flush against the rim.
Gathering and Prepping the Needles
Every coiled basket starts on the forest floor, not at the workbench. The video shows collecting pliable bundles of brown pine needles, then cleaning away dirt and loose bark by hand before sorting the needles by size. That sorting step matters for anyone trying this themselves — mixing needle lengths later makes it harder to keep a coil’s thickness consistent.
Before any needle touches thread, the bottom caps — the fascicle sheaths that hold each needle cluster together at the base — get removed. The needles then go into a soak of water, which is the step that keeps them from cracking once they’re bent into a spiral. Dry pine needles are brittle; soaked ones flex.
Building the Coiled Core
The technique demonstrated is classic coiled basketry: gather a small bundle of softened needles, wrap the starting end tightly with thread, and bend that wrapped end into a tight central spiral. That spiral becomes the core the entire basket grows from.
From there, the weaver keeps feeding new needle clusters into the working bundle to keep its thickness even, stitching the bundle down through the previous row with the tapestry needle as she goes. It’s a repetitive, rhythmic process — the kind of project other Wild She Goes builds, like the bushcraft tent made from plastic wrap, lean into as well: slow, hands-on work with materials pulled straight from the woods.
Handwoven pine needle baskets are always a little imperfect — but the process is very enjoyable.
Turning a Flat Base Into Walls
Once the base coil lies flat, the basket needs walls, and that’s where the technique shifts. Instead of stitching the new coil beside the previous row, the weaver angles each consecutive coil on top of the one before it. That upward angle is what pulls the flat spiral into a rising, bowl-shaped form.
It’s a small adjustment in hand position but it’s the entire difference between a flat mat and an actual basket — get the angle wrong and the walls either flare too wide or cave inward.
Tapering Off and Finishing the Rim
Every coiled basket needs a clean exit, and the video shows that final stretch clearly: gradually tapering the pine needle bundle down to nothing, securing the last few stitches tightly, and knotting the cord flush against the rim so no loose thread sticks out. For anyone gathering their own foraged materials to try this at home, the same patience that applies to shelter-building projects like the channel’s solo overnight build of a sandbag shelter applies here — the finishing details are what separate a rough attempt from something you’d actually want to use.
Next time you’re walking under a stand of longleaf or ponderosa pines and there’s a fresh drop of brown needles on the ground, that’s the raw material for this exact project — no store trip required, just a needle, some cord, and enough patience to soak, sort, and coil your way to a rim.





Bass Love Spiders!
How to Make a DIY Greenhouse
Building An Underground Tunnel Swimming Pool Around An Underground Mansion
Graphic Designer Builds Custom 4×4 FUSO Overland Tiny Home for World Travel
5 Fast Growing Veggies You Can Harvest in Under 1 Month